Two of my most viewed blog posts are, “
The Bear Grylls Survival Bracelet” and “
The Parachute Cord Duck Call Lanyard”, clearly there is a popularity associated with constructing your own unique outdoor items.
Both of these projects were constructed using that most amazing of survival items, 550 parachute cord. Widely available online, as well as from any good army surplus shop, 550 cord (as it is more commonly called) is the
survivalists friend. For more information on this marvelous item, please read “String Theory
I and
II”.
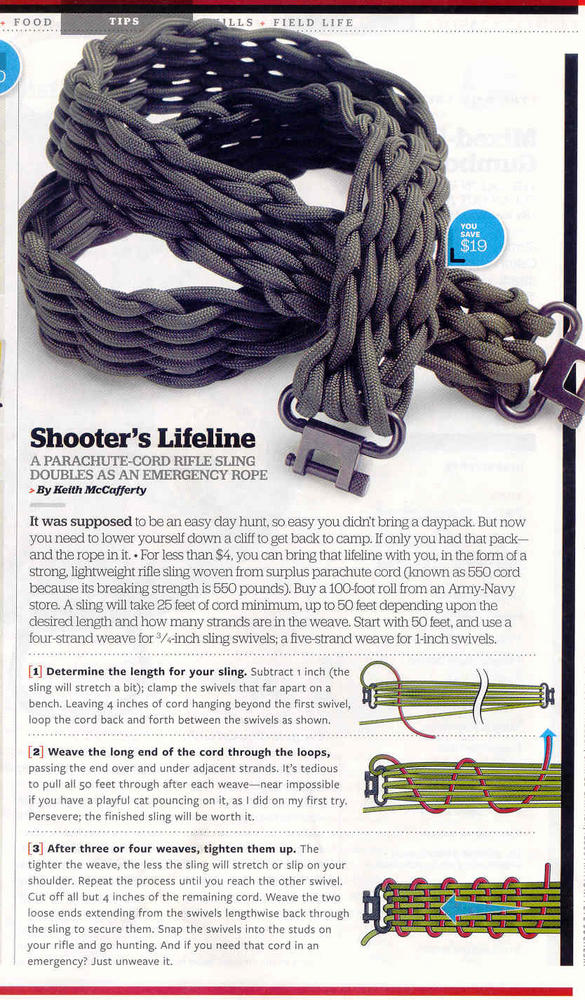
Since I had not organized any 550 cord projects in quite some time, I decided to undertake, the weaving of a sling for my AR15. The inspiration for this project came from an article published in
Field and Stream magazine, written by Keith McCafferty titled, “A Shooters Lifeline”. This short “how to”, outlines the weaving of a firearm sling, constructed using two sling swivels and 550-parachute cord.

Of course as a man, it is extremely difficult to simply “follow the directions” and because of this, typically easy projects frequently mutate to an obscene level of complexity. Rather than attempt to build the predefined
F&S project with the provided directions, I instead added a number of changes I feel enhance the originally published design. Bottom line, this is a VERY cool sling and I am overall pleased with the final results!
The article lists the “price” for this project at “less than 4 dollars”. This statement is of course a bald faced lie. The total cost of the project was about $20 once you purchase the
Outdoor Connections – Talon Swivels ($11) and the 100 feet of 550 cord ($8) that is likely the smallest packet you will be able to find. Also the
F&S project lists the amount of 550 cord need at 25-50 feet, for my modified project, you will need 100 feet.
With the initial investment to of money, it is also important to plan to expend about 3 hours in labor. Still, even with the expense and time commitment, it is overall a great project and while you could buy a sling for a comparable amount of money, it would not be a custom sling made of 550 cord and built by your own hand.
 The Project:
The first thing you will want to do is measure the length of one of your current rifle/shotgun slings. Remember, this “550” sling will NOT be adjustable, so whatever length you ultimately weave is going to be the final measure. The
F&S article warns that the sling will stretch up to 1 inch so you should shorten this measurement appropriately. I however, made no adjustment to my version of the sling and have not noted any problems. My sling is 36 inches long.
Once you determine the correct length, drive two nails or hooks into a board at that precise measure. Slide your two swivels onto each of the two hooks and check the measurement again laying your properly adjusted sling next to the two swivels. I stress this step to make sure you did not inadvertently mis-measure. Three hours is a sizeable investment, so you want this perfect.

String your 550 cord through the sling swivels, as directed in the
F&S article. Though the article suggests a 4 or a 5 strand weave, my sling uses 1 ¼ inch swivels so was constructed using a 6 strand weave . . . insert hardy man grunting. It is IMPORTANT to do as the article directs and leave 4-6 inches of extra cord for the tying of the finishing knot. Take this extra cord and tie it loosely around your hook to keep it out of the way and from accidentally pulling through the swivel.
Now this is the where my sling begins to depart from the
F&S article. First make sure to START your weaving at the OPPOSITE sling end of where your 4-6 inches of extra chord is set. This will ensure that at the projects completion these two ends can be tired together in a square knot to “finish” the weave.
Begin weaving left to right and over and under each of the double strands. Be sure to push down hard so that the weave properly compresses. You will be amazed how much more the weave will compress, as you continue weaving, so keep forcing it down. Take care to see that you have started the weave correctly, it is discouraging to get in 10 rows only to realize you made a mistake on the first row and you now need to undo all of your initial work . . . this is the voice of experience.

It helps in the weaving process, to wrap the 70 feet of 550 cord around your hand and to bundle it securely with a rubber band. This makes it so you are not pulling the entire length of cord through each weaving sequence. Simply slowly pull out more cord, as needed, from the bundle as you progress through the project.
Once you get the weave about 20 inches in length, you are going to want to stop. Next begin wrapping the remaining 550 cord around the existing strands. Continue this wrapping all the way to the top while continuing to push down hard to really compress the wrapped weave. Once you have reached the top, tie the weave end to the 4-6 inches of extra cord you left out at the beginning of the project, using a square knot. Make sure to tie this knot securely. Cinching it by pulling on each of the two tag ends with pliers this will create a knot difficult to accidentally come undone.
NOTE: In the picture to the left, you will see that I also incorporated a "
wrapped knot" before the start of my weave. This was done at the projects completion when I realized that I need to further compress the shoulder section of the weave. So basically to correct my error. Fortunately, I actually think it makes the sling look more interesting.
At the projects completion you will have remaining about 5-6 feet of 550 cord. Do
NOT throw this small section of cord away! With the left over remnants you can easily construct a . . .
The continuation of the post will appear next Monday!


 Of course as a man, it is extremely difficult to simply “follow the directions” and because of this, typically easy projects frequently mutate to an obscene level of complexity. Rather than attempt to build the predefined F&S project with the provided directions, I instead added a number of changes I feel enhance the originally published design. Bottom line, this is a VERY cool sling and I am overall pleased with the final results!
 The Project:
 String your 550 cord through the sling swivels, as directed in the F&S article. Though the article suggests a 4 or a 5 strand weave, my sling uses 1 ¼ inch swivels so was constructed using a 6 strand weave . . . insert hardy man grunting. It is IMPORTANT to do as the article directs and leave 4-6 inches of extra cord for the tying of the finishing knot. Take this extra cord and tie it loosely around your hook to keep it out of the way and from accidentally pulling through the swivel.
 I am regularly impressed by the
quality of Maine based products found throughout the state. You certainly do not have to look
very far to find skilled craftsmen plying their trade out of small shops,
building superior pieces of handmade merchandise. These individuals have honed
their skills over decades and are masters of their perused craft. Because of
the huge number of craftsmen, around the state, creating truly exquisite pieces
of what I would categorize as “art”, I am always on constant alert as to what
could be the next new and interesting Maine
made outdoor products.
I am regularly impressed by the
quality of Maine based products found throughout the state. You certainly do not have to look
very far to find skilled craftsmen plying their trade out of small shops,
building superior pieces of handmade merchandise. These individuals have honed
their skills over decades and are masters of their perused craft. Because of
the huge number of craftsmen, around the state, creating truly exquisite pieces
of what I would categorize as “art”, I am always on constant alert as to what
could be the next new and interesting Maine
made outdoor products.


